

The Ultimate Guide To Ableton Live 11 Keyboard Shortcuts
Why Learn The Essential Ableton Live 11 Keyboard Shortcuts?
We will be honest, keyboard shortcuts are not the most exciting topic in the world.
But working faster, getting more music done, and being more creative are all really exciting. This is why we did a whole post just on Ableton Live 11 Keyboard Shortcuts.
Learning keyboard shortcuts will let you do those things, so they are worth learning. Life is too short to waste time in a dropdown menu somewhere.
Why is this such a big deal? Because you waste time and focus fishing around in menus with the mouse. And the workflow of music production requires that we use the mouse a lot anyway.
So, anytime you can free up your hands to move faster, this save a little bit of mental stamina that can go into creative tasks, not moving the mouse around. Also, some helpful features are only accessible with keyboard shortcuts. So, you have to learn a few anyway.
A couple seconds here and there will add up to days of your life saved over the course of a year.
We will cover the most important keyboard shortcuts to know, how to look up shortcuts as you work, and even how to program your own shortcuts if one doesn't exist yet.
Learn The Ableton Shortcuts These In Order
All these shortcuts are in the Live manual. But we wanted to teach you the best order to learn them in instead of throwing a book at you and saying good luck.
The most important shortcuts are earlier in the article. This is the stuff we can't live without and that will dramatically speed up your workflow.
The more niche shortcuts come later. They're still useful, but you they tend to be used in more specific situations.
Over time you'll learn all the shortcuts. Just try to pick one or two new ones every time you sit down to work. The main point is these are the most important keyboard shortcuts we actually use every time we sit down to produce.
How To Use This Guide & CMD⌘ + F
Before we start learning Ableton 11 keyboard shortcuts, you need to learn one of the most important shortcuts on your entire computer. This will make you faster at learning and overall better at using computers in general if you don't already know it.
Read that again. We're not kidding.
That magical shortcut is: CMD ⌘+ F (Mac) or CTRL + F (Windows)
Remember by thinking that F stands for "Find in Page"
It opens a search box where you can type in the term you're looking for.
Try it now. You should use this whenever you need to search long webpages or PDFs. You can now save this page and use it as a reference later. Just hit ⌘+ F and type the command you are looking for, then use the arrow keys to scroll through mentions of your search until you find the command you need.
Unless you have freakishly good memory, you won't remember every shortcut we talk about here. But you can bookmark this page, then come back and use CMD ⌘+ F to find the shortcut you need. Some people like to print out a "cheat sheet" but you can't search that like you can a web page.
Also, CMD ⌘+ F is the Ableton Shortcut to search in the browser.
Windows vs Mac Keyboard Shortcuts
Some of you are on Mac and some will be on Windows. Here is how the shortcuts translate:
CTRL on Windows does the same thing as CMD ⌘ on Mac.
ALT on Windows is usually the same as OPT ⌥ on Mac.
Shift ⇧ is the same on both.
Here's the confusing one: Macs also have a CONTROL^ key that is not the same as on Windows.
Macs also have a Function (FN) key that you sometimes need depending on your keyboard. This comes up much less on Windows systems.
We mostly use Macs here so we will use the symbols for each key. Windows users can just substitute the equivalent key as you need. When there is a completely different Windows command, we will list it.
A good example is the shortcut for Full Screen Mode with is F11 on Windows, but on Mac it is CTRL + CMD + F. Since on Windows you usually substitute CMD for CTRL, this doesn't work because you would need 2 CTRL keys which doesn't make any sense.
The 3 Basics
While we're at it, there are 3 other basic shortcuts you need to know that are pretty universal in most computer programs and you will use them all the time in Ableton Live.
Cut: CMD ⌘ + X
Copy: CMD ⌘ + C
Paste: CMD ⌘ + V
These are handy for moving audio and midi clips around, as well as modifying effects racks, moving presets from one track to another and a zillion other things. You should never be going into the menus for these three unless you enjoy wasting time.
The Ableton Live Help Menu: SHIFT⇧+ ?
This one will help you learn what things do in Ableton as well as look up more keyboard shortcuts inside the DAW. Ableton Live has a Help menu you can open and close with ⇧+ ?
You will see it appear in the lower left corner of the screen.
Have a question? Just open the help menu and put the mouse over the item you have a question about. There will be a short explanation and any available shortcuts. Try to use that shortcut next time.
Save Your Work (And Your Sanity)
This should be an obvious one. Ableton Live has a good backup and recovery system, but why leave it to chance?
Save: CMD ⌘ + S
Save As: CMD⌘ + SHIFT⇧ + S
There is unfortunately no stock shortcut for Collect All and Save. We will teach you how to make custom shortcuts later on in the article for this one.
Here's another essential for when you accidentally highlight your project and bump the delete key:
Undo: CMD ⌘ + Z
Did you just Undo some automation that took you 3 hours to get right?
Redo: CMD ⌘ + SHIFT⇧ + Z
We would have gone crazy a long time ago without these last two shortcuts.
Ableton Transport Shortcuts (Play, Stop, Record)
On most DAWs including Ableton Live, the Spacebar toggles play and stop in the transport.
Live by default restarts playing from the place where the cursor is on the timeline.
To continue playing from Stop Point: SHIFT⇧ + spacebar
F9 toggles the Arrangement record button. On a Mac, depending on the keyboard you use, this may be FUNCTION (FN) + F9. The Function key is located in the lower left corner of an Apple Keyboard. If you use a 3rd party keyboard with a dedicated F9 button, you don't need to do this.
Arrangement/Session View Ableton Shortcuts
Ableton Live has two views for working with audio and MIDI clips. The session and arrangement view.
Use the TAB key to toggle between the session view and the arrangement view.
Learning Ableton Views Shortcuts
One of the cool things about Ableton Live is you can easily toggle most parts of the interface to be hidden or shown with keyboard shortcuts.
This helps de-clutter the screen and keep a clear head as you work. We have found that just being able to get things you don't need out of the way quickly speeds up out whole flow in the studio. Especially when we need to edit or come up with new ideas for a track we're writing.
We already talked about how to toggle the help menu so let's learn the rest.
(By the way, here's the trick to remember these. They are mostly in this format: CMD ⌘ + OPT ⌥ + a letter key)
Show/Hide Browser: CMD⌘ + OPT⌥ + B
Show/Hide Detail View*: CMD⌘ + OPT⌥ + L
Show/Hide Mixer Section: CMD⌘ + OPT⌥ + M
Show/Hide Return Tracks: CMD⌘ + OPT⌥ + R
Show/Hide In/Out Section: CMD⌘ + OPT⌥ + I
Show/Hide In/Out Take Lanes: CMD⌘ + OPT⌥ + U
Show/Hide In/Out Groove Pool: CMD⌘ + OPT⌥ + G
Show/Hide In/Out Plugin Windows: CMD⌘ + OPT⌥ + P
*The Detail View is the pane at the bottom of the screen where you can switch between the Piano Roll or Audio Clip and your instrument and effects devices. Press Shift + TAB to toggle between your audio or MIDI clip and the devices on that track in the Detail View.
Moving Around - Use the Arrow Keys
You can almost always use the arrow keys in Ableton Live to move around and do things. You can move around the Browser between sections, move the cursor in the Arrangement view, change cells in the Session View, and move notes as well as the cursor in the Piano Roll using the Arrow Keys.
Additionally, in the browser the right arrow key is Preview Selected Browser Item. It will play a selected sample for preview.
General Editing Keyboard Shortcuts
The next set of shortcuts come up all the time when we're editing a track and are going to be used a lot when dealing with both audio and MIDI clips.
Create New Audio Track: CMD ⌘+T
Creates a new Audio Track. Sometimes referred to as insert audio track, which means the same thing.
Rename: CMD⌘ + R
Most things that have a name in Ableton Live can be renamed, like tracks, clips, effects racks, Ableton drum racks, instrument racks, and other devices. This works for pretty much all of them.
Duplicate: CMD⌘+D
Similar to Rename, you can Duplicate tracks, Clips, effects, and more with the Duplicate shortcut.
Create New MIDI Track: CMD⌘ + SHIFT⇧ + T
This shortcut creates a new MIDI track.
Insert New MIDI Clip: CMD⌘ + SHIFT⇧ + M
Highlight an area in the timeline inside a MIDI track, then use the insert midi clip shortcut CMD⌘ + SHIFT⇧ + M to create a new MIDI clip.
Group Tracks or Devices: CMD⌘+G
Select a few tracks and existing Groups, then CMD⌘+G will create a new group. This also applies to devices in the Detail view area. Select the devices you want to group together by holding SHIFT and clicking
Insert Return Track: CMD⌘ + OPT⌥ + T
Use this shortcut to create a Return Track for effects, especially time based effects.
Loop Selection: CMD⌘+L
Select an area in the arrangement view and press CMD⌘+L to set the loop length and markers to that area. This is also helpful to know when setting points to punch in or punch out when recording overdubs in addition to setting the loop selection.
Fine Tune Parameters: SHIFT⇧ + Drag
This is not strictly a keyboard shortcut because it requires the mouse, but it is still an extremely handy shortcut. Sometimes when you are adjusting parameters with the mouse , you need to hit a specific value and its easy to miss the exact setting you want.
If you click and drag the automation parameter or device control while you press SHIFT⇧, the values will move more slowly. This makes it easier to dial in the exact setting you want.
Consolidate Clips: CMD⌘+J
This shortcut works in both audio tracks and MIDI tracks. Select 2 or more clips in a track, then use CMD⌘+J to combine them. MIDI clips will be joined and Audio Clips are bounced to a new file and normalized.
Split Clips: CMD⌘+E
Put the cursor where you want to cut a clip using the mouse or arrow keys, then simply press this shortcut to split the clip.
Toggle Draw Mode: B
Press B to Toggle the Pen Tool, also known as Draw mode. This is used in Automation to change automations by literally drawing them in instead of programming them with individual automation breakpoints.
Curve Automation: Hold OPT⌥ and hover over the automation segment
Did you know that in Ableton Live 11 you can create curved automation segments. Hover the mouse over a linear segment and hold OPT⌥. You will see the mouse icon change to have a small curved icon. Click and drag to shape the curve of the segment.
Toggle Computer MIDI Keyboard: M
If you are pressing the B key or C key and they aren't working, you might have the Computer MIDI Keyboard enabled which allows you to play MIDI instruments with the same keyboard you use to type on when you normally use your computer.
When the Computer MIDI Keyboard is enabled, the Z and X keys change the octave of the keyboard's notes up or down, and the C and V keys adjust the velocity since a standard computer keyboard does not send velocity data like a proper MIDI controller does.
Arm Selected Tracks for Recording: C
Self explanatory. This will toggle the record arm for a track.
Toggle Automation Mode: A
Toggles the automation lanes to be hidden or shown. If it isn't working, double check that the Computer MIDI keyboard isn't enabled, otherwise the A key just sends a MIDI note.
This is especially useful in sessions with a lot of automation and numerous automation lanes you want to keep out of the way when you don't need to adjust them.
Solo a Track or Group: S
Helpful when editing or mixing and you need to quickly check or toggle and individual track. You can move between tracks with the Up and Down arrow keys.
Incremental Zoom In/OUT: + & - keys
In the arrangement view, use + to zoom in and - to zoom out.
These shortcuts also shows/hide devices in the Detail view at the bottom of the screen when they are visible. Use - to collapse a device or + to expand it.
Optimize Height and Width: H & W keys
Optimize height width H or W keys. Helpful for when all your tracks are at different heights or you have to back out of working on something that required you to zoom all the way into the timeline.
Zoom To Selected Time (Z)
Highlight an area and hit Z. Live will zoom into to what you highlighted. Hit Z again and it will increase the track height so you can see what you are doing more easily. Hit Z a third time to go back a step, but stay zoomed into the area.
Zoom Out From Selected Time (X)
Think of X as the inverse of the Z key. Hit X to zoom out.
Mouse Scroll Zoom: CMD⌘ + Scroll and OPT⌥ + Scroll
Hold CMD⌘ and move the scroll wheel. Live will horizontally zoom in.
If you hold OPT⌥ and move the scroll wheel, Live will zoom vertically depending on where it is positioned.
Collapse all tracks: OPT⌥ + U
This is an easy command to hit accidentally which will collapse every track in the session. If you don't know this one and keep collapsing a large project while you're trying to work, it can be really frustrating.
However, if you know it, it will help you navigate a large project with ease.
Adjust Individual Track Height: OPT⌥ + Mouseover & Scroll
Use this one with the last command to quickly expand the track you need to adjust in a large session. Hold the option or alt key, hover the mouse of the track you want to adjust and move the scroll wheel to expand it vertically.
Adjust and Effect Control: Click + Type Numbers + ENTER
Need to enter and exact value for the control of a device? Say you need the output gain of an effect to be exactly -12.6dB. Click on the control then type in the number you want and hit Enter.
Alternatively, you can use the arrow keys to adjust the value in small increments as well.
Return To Default: Del or Double click parameter
This is one of those features that is only available via the shortcut. Want to return an control of effect or a slide on the mixer to its default value? Double click it or select it and hit delete.
Duplicate a section: CMD⌘ + SHIFT⇧ + D
To duplicate a particular part of audio clips or MIDI clips, select the region, then hit CMD⌘ + SHIFT + D as many times as you need and live will insert the duplicates.
Much faster than manually copy and pasting the element even if you know the shortcuts for copy and paste.
Reverse Audio Clip Selection: R
Great for editing and experimenting or creating a smoothly looping audio clip. Select the clip and hit R to reverse.
Disable Clip: 0 (zero)
Need to try different options quickly? Use the zero key to toggle selected audio and MIDI clips on or off so you can compare and decide if a part is worth keeping without having to delete it. Sometimes you need to try a few different combinations of sounds and this shortcut makes it very fast to do so.
Insert Silence: CMD⌘ + I
Have you ever had a cool idea while writing a track that required you extend a section in the middle of the tune? If you have a big session with lots of tracks with automation data it could be very tedious to select everything then manually drag them to create the space you need.
Instead, just put the cursor where you want to insert empty space, hit CMD⌘ + I and enter the amount of time you want to create in the dialog box. This might be as little as a beat or as much as a 32 measure section.
Delete Time: CMD⌘ + SHIFT⇧ + X
This is the opposite of the previous command. Highlight the selection in time you want to remove, hit CMD⌘ + SHIFT⇧ + X and Live will remove it across all tracks
Move a clip: Highlight + Left and right arrows
In the arrangement view, click on a clip you want to move and use the arrow keys to move it. You can change how much it is moved by adjusting the Grid size. The Grid shortcuts are a few items down on the list.
Modify Selection: Click + SHIFT⇧+ Arrow Keys
You can click to place the cursor on the timeline in the arrangement view, then if you hold SHIFT⇧ while you tap the arrow keys, you can modify the selected part of the clip to the desired length or extend the selection to other audio or Midi tracks.
This is very helpful when you need to split several clips if you combine it with the Split Clip shortcut CMD⌘+E. Place the cursor with the mouse, hold Shift and use the up/down arrows to extend the cursor into other tracks, then split them.
Grid Shortcuts: CMD⌘+ 1, 2, 3, 4, 5
Use these shortcuts to modify the grid size as you edit.
Narrow Grid: CMD⌘+ 1
Widen Grid: CMD⌘+ 2
Toggle Triplet Grid: CMD⌘+ 3
Toggle Snap To Grid: CMD⌘+ 4
Toggle Fixed Grid: CMD⌘+ 5
Insert Take Lane: OPT⌥ + SHIFT⇧ + T
Take lanes allow you to comp together a single audio track from multiple clips of audio very quickly.
This is a handy shortcut to know if you record yourself or others often. Especially vocalists. You will need to create new take lanes very quickly on the fly.
Shortcuts For Editing MIDI Clips In The Piano Roll
The following Ableton Live 11 keyboard shortcuts mostly apply to working specifically in the piano roll when editing MIDI clips. These are going to be used especially often if you use a lot of VST instruments.
Move MIDI Notes: Arrow Keys
You can click on MIDI Notes (hold SHIFT⇧ to select a group of them ) and then move them around the piano roll with the arrow keys.
If you hold SHIFT⇧ and tap the Left/Right Arrow Keys with MIDI notes selected, you will modify the note length according to the current grid width.
If you hold CMD⌘ and tap the Left/Right Arrow Keys you can move the notes in very small increments.
Transposing Octaves: SHIFT⇧ + Down Arrow↓ or SHIFT⇧ + Up Arrow↑
Select a MIDI note or a group of notes, hold SHIFT⇧ and tap the Up/Down Arrow Keys to transpose those notes by octaves
Quantize: CMD⌘ + U
Select a group of notes and simply press this command to quickly quantize them.
Quantization settings: CMD⌘ + SHIFT⇧ + U
Need to adjust the quantization settings? Use this shortcut to quickly access the menu, make your selection, then use CMD⌘ + U to apply it.
Change MIDI Editing Detail View: OPT⌥ + 1, 2 3
Use the following key commands when editing notes and automating envelopes or note expression in the piano roll to move between their respective views quickly.
MIDI Piano Roll: OPT⌥ + 1
Envelopes: OPT⌥ + 2
Note Expression: OPT⌥ + 3
Mapping and creating your own Ableton Live 11 Keyboard Shortcuts in the OS
Learning the default shortcuts in Ableton Live will help you to work much more efficiently, however sometimes you need to create custom Ableton shortcuts. There are a few ways to do this. Namely, the MIDI mapping mode, Key mapping mode, and modifying keyboard shortcuts for the app in your operating system.
Midi Mapping Mode: CMD⌘+M
This method of creating a MIDI map is mostly used for assigning different MIDI controllers to various parts of Live.
Hit CMD⌘+M, to enter MIDI Map mode. You will see a bunch of elements in the User Interface turn a dark purple color. Anything that changed to this color can be mapped. Select the control you want to assign, then move the knob or slider on your connected MIDI controller you want to map it to. Live will automatically assign it. Hit CMD⌘+M again to exit mapping mode and the control you moved should be able to adjust the mapped parameter.
Key Mapping Mode: CMD⌘ + K
Key mapping is very similar to MIDI mapping, except instead of mapping a MIDI controller, you can map a custom shortcut. Say for example you want to use a keyboard shortcut to turn a device on or off. Same process as a MIDI map.
Hit CMD⌘ + K, select the element you want to map, then press a key on the keyboard and exit the mapping mode.
Custom Shortcuts
Need to create a custom keyboard shortcut at the operating system level? This is usually because there is a function you want to access in the menus that does not have a shortcut assigned.
Some software has a shortcut mapping menu that you can completely customize to whatever you want. This is extremely helpful because if you use several different types of editing software like Ableton Live, Logic Pro, Pro Tools, Adobe Suite, etc you can keep most of your shortcuts relatively consistent.
However, Ableton Live does not have this feature natively yet. Luckily, there are ways around this.
For example, MacOS allows you to do this natively in the operating system. Navigate to Preferences, then choose Keyboard, then click the Shortcuts tab.
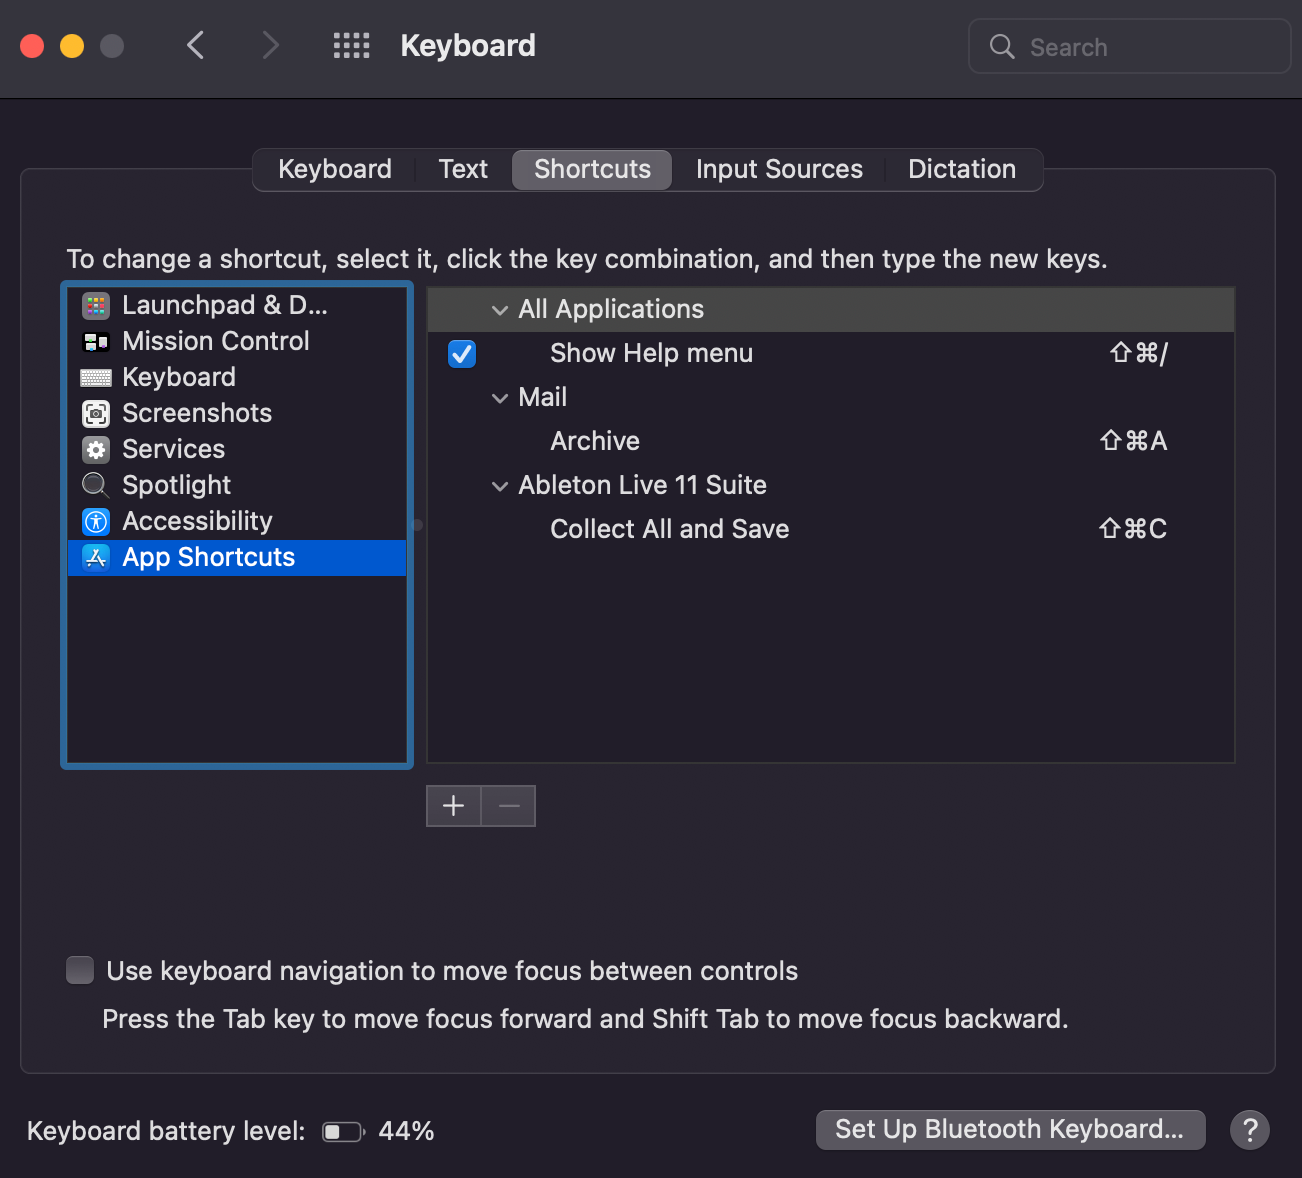
You will need to click the + button, choose, Ableton from the menu, then enter the exact command in the menu you want to create a short for, and finally hit those keys on the keyboard. Next, press Add and restart Ableton. You now how a custom shortcut you can use.
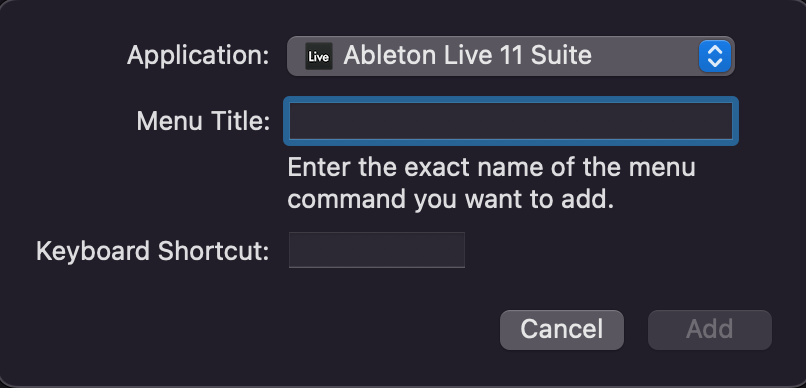
We set the shortcut CMD⌘ + SHIFT⇧ + U to trigger Collect All and Save because we also want to copy over audio files into the project folder when we save a project.
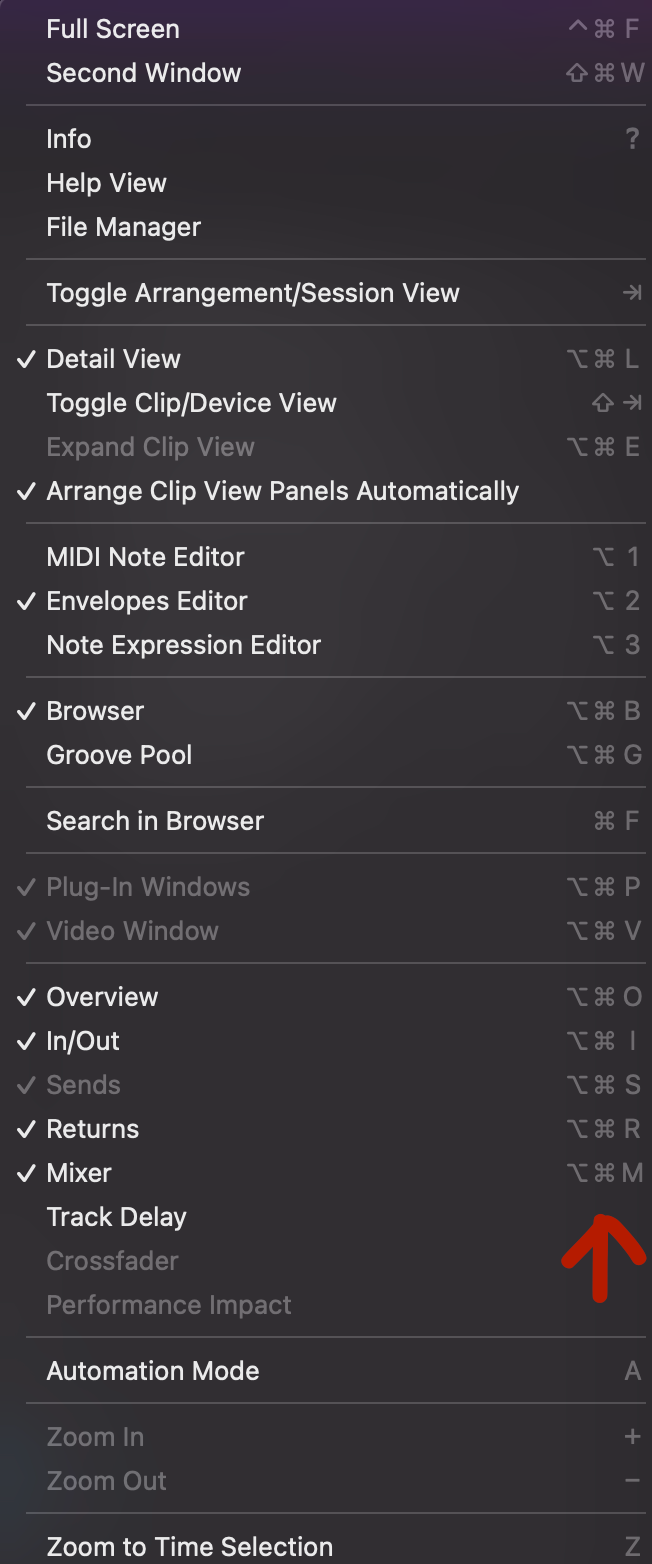
You will not be able to do this with options found in a context menu by right clicking, but anything from the top menu bar should be possible.
Wrapping Up Ableton Live 11 Keyboard Shortcuts
There are of course more Ableton keyboard shortcuts you can learn by just looking up commands in the menus.
However, these are the commands we use the most when we're actually working on music.
We also did our best to put these in roughly the order of importance that you should learn them in.
We will say it again: do not get overwhelmed. Just start at the beginning or leave the page open in a tab while you're working on music, then search for the command you need.
Make yourself learn a new command or two every time you work and eventually you'll have them committed to memory because they save a ton of time. So you use them over and over again, which helps teach your fingers where to go.
The Real Magic Part
After a while, you'll get so good with shortcuts that working in the DAW starts to feel kind of like playing an instrument. You decide you want to do something and your fingers just go to where they need to without having to think about it at all.
Over time, you will become extremely fast at editing to the part where its hard for someone watching to keep up with what you're doing. But the key is not to be in a rush to get there and trust the process.


